What is Git?
What is Git?
Silent Reading Time: 10 mins 15 secs
Git is free and open source software for distributed version control: meaning, it tracks changes to any set of files across multiple different machines and users. Usually used for coordinating work among programmers collaboratively developing source code during software development. Its goals include speed, data integrity, and support for distributed, non-linear workflows (thousands of parallel branches running on different systems).
Like other distributed version control systems, and unlike client-server systems, every Git directory on every computer is a fully-fledged repository in it’s own right, with complete history and version-tracking: independent of a central server.
Git was created in 2005 by Linus Torvalds, the main developer of the Linux kernel, and he is quoted as having named both Linux and Git after himself:
I’m an egotistical bastard, and I name all my projects after myself. First ‘Linux’, now ‘git’.
How does Git work?
Linus’ original design for Git was inspired by BitKeeper, a proprietary version control which was commonly used by Linux developers. It was designed to be a low-level version control which could be used as the basis for front ends, such as Cogito which was the first front end for Git.
Git’s design was influenced by Linus’ experience in maintaining large distributed projects and his need to quickly produce a working system.
The underlying structure of Git is not strictly a source-code management system but a file system. Again, Linus explained:
In many ways you can just see git as a filesystem—it’s content-addressable, and it has a notion of versioning, but I really designed it coming at the problem from the viewpoint of a filesystem person (hey, kernels is what I do), and I actually have absolutely zero interest in creating a traditional SCM system.
Building on this design approach, Git has developed the full set of features expected of a traditional SCM. Features have mostly being created as needed, then refined and extended over time.
Git has two data structures: a changeable index (also called stage or cache) that caches information about the working directory and the next revision to be committed; and an append-only object database.
The index serves as a connection point between the object database and the working tree.
The object database contains five types of objects:
- A blob (binary large object) which the content of each file. Each blob is a version of a file, holding that version of the file’s data. Blobs have no proper file name, time stamps, or other metadata; a blob’s name internally is a hash of its content.
- A tree object, which is the equivalent of a directory and contains a list of file names, each with some type bits and a reference to a blob or tree object that represents a file, symbolic link, or directory’s contents.
- A commit object links tree objects together into history. It contains the name of a tree object, a timestamp, a log message, and the names of zero or more parent commit objects.
- A tag object is a container that references another object, most commonly the digital signature of a commit object for a particular release of the data being tracked by Git.
- A packfile object is a zlib version compressed of various other objects for compactness and ease of transport over network protocols.
Each object is identified by a SHA-1 hash of its contents. Git computes the hash and uses this value for the object’s name. The object is put into a directory matching the first two characters of its hash. The rest of the hash is used as the file name for that object.
Each version of a file is stored as a unique blob with the relationships between the blobs stored in the tree and commit objects. When a new file is created, the blob contains it’s entire content, but to save space new versions of that file contain only changes relative to previous blobs - a process known as delta compression. Git also stores various labels called refs which indicate the locations of various commits. They are stored in the reference database and are respectively:
- Heads (branches): A branch, to the user, is a snapshot of your changes. In Git this is handled by creating a named reference to a commit and automatically re-pointing that reference when a commit is made on top of the current head.
- HEAD: A reserved head that will be compared against the working tree to create a commit. It shows the “tip” (latest commit) of a branch.
- Tags: Like branch references but fixed to a particular commit. Used to label important points in history such as releases.
Using Git
I am, by no means, an expert on Git so the following is based on my experience of using Git in various companies and is, in my view, an example of standard usage.
Getting Started
Git can be used with various UIs and plugins for common IDEs, such as Visual Studio Code, Sublime, Notepad++ and others. Or it can be used via the command line (CLI).
These initial examples show how to create a local repository and make a commit using just the CLI.
First, I’ll create a new directory, change to this new directory and initialise it as a Git repository
$ mkdir ./git-example
$ cd ./git-example
$ git init
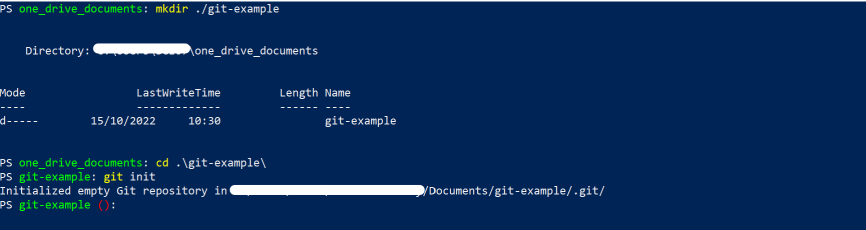
Git has now initialised my directory as an empty repository.
Before running any operation, Git will need to know who you are. Update the Git config with the following commands:
$ git config --global user.name "Your Name Comes Here"
$ git config --global user.email you@yourdomain.example.com
Next I can add a file.
$ touch ./new_file.sh
We can then check the status of our Git tracking with git status.
$ git status
Which will show that the new file is not yet being tracked. We can add untracked files with git add
$ git add .
This will add the untracked new file to Git’s cache. The . will add all files, or file paths can be specified. We can see this has been successful by running git status again.
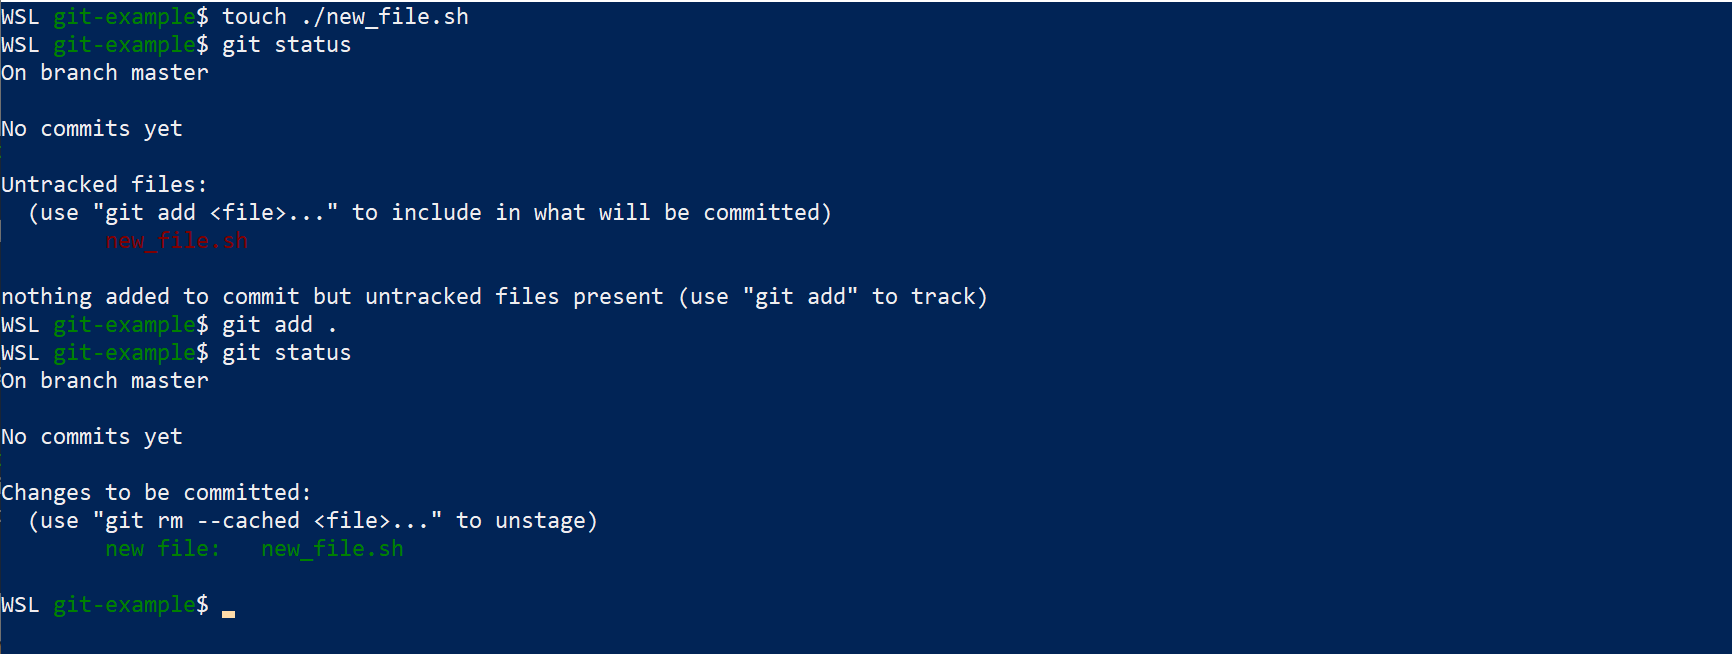
Files ready to be committed are ‘staged’ and can be ‘un-staged’ by removing new files from the cache with git rm --cached <file> or restoring old versions with git restore --staged <file>.
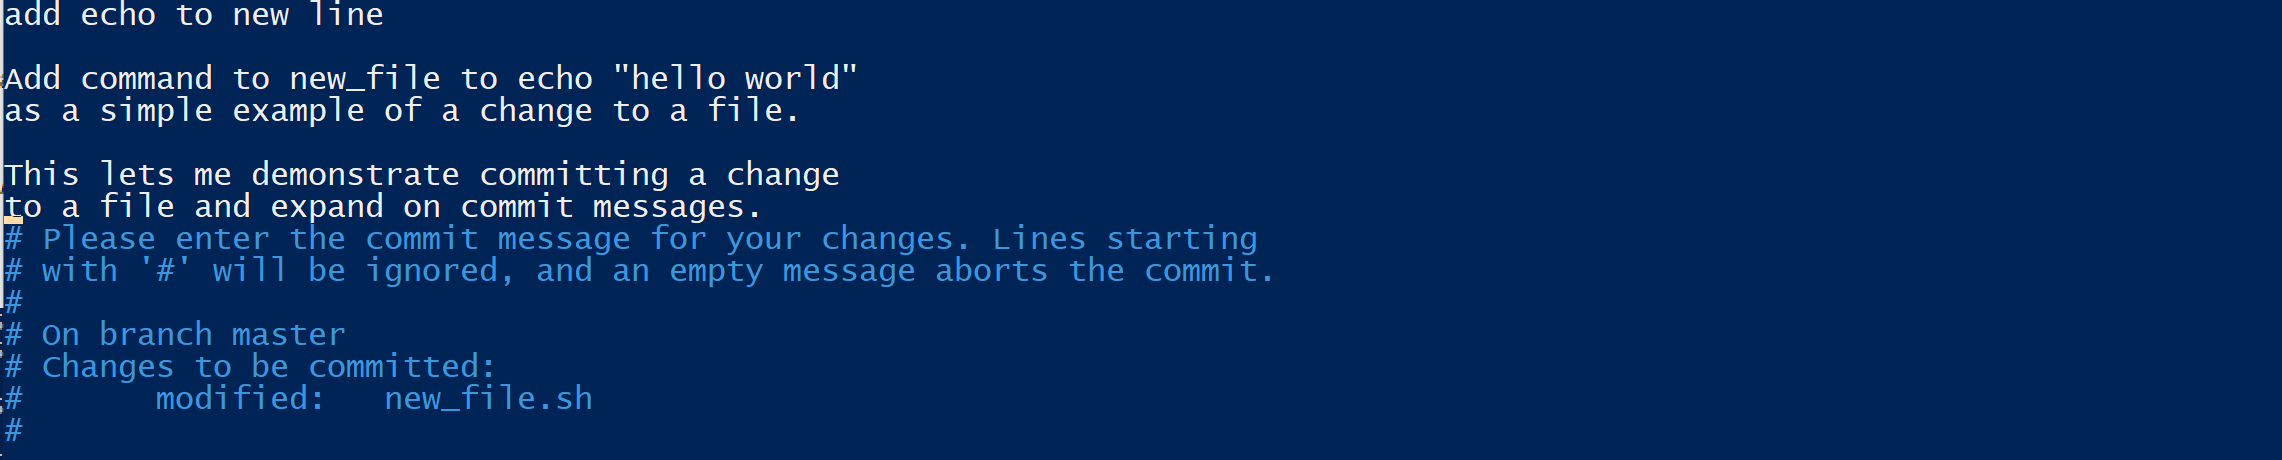
We are now ready to commit our file, which we do using the git commit command. You can add a commit message with the -m flag or will be prompted to add one if not using the flag.
$ git commit -m "Initial commit"

Committing Changes
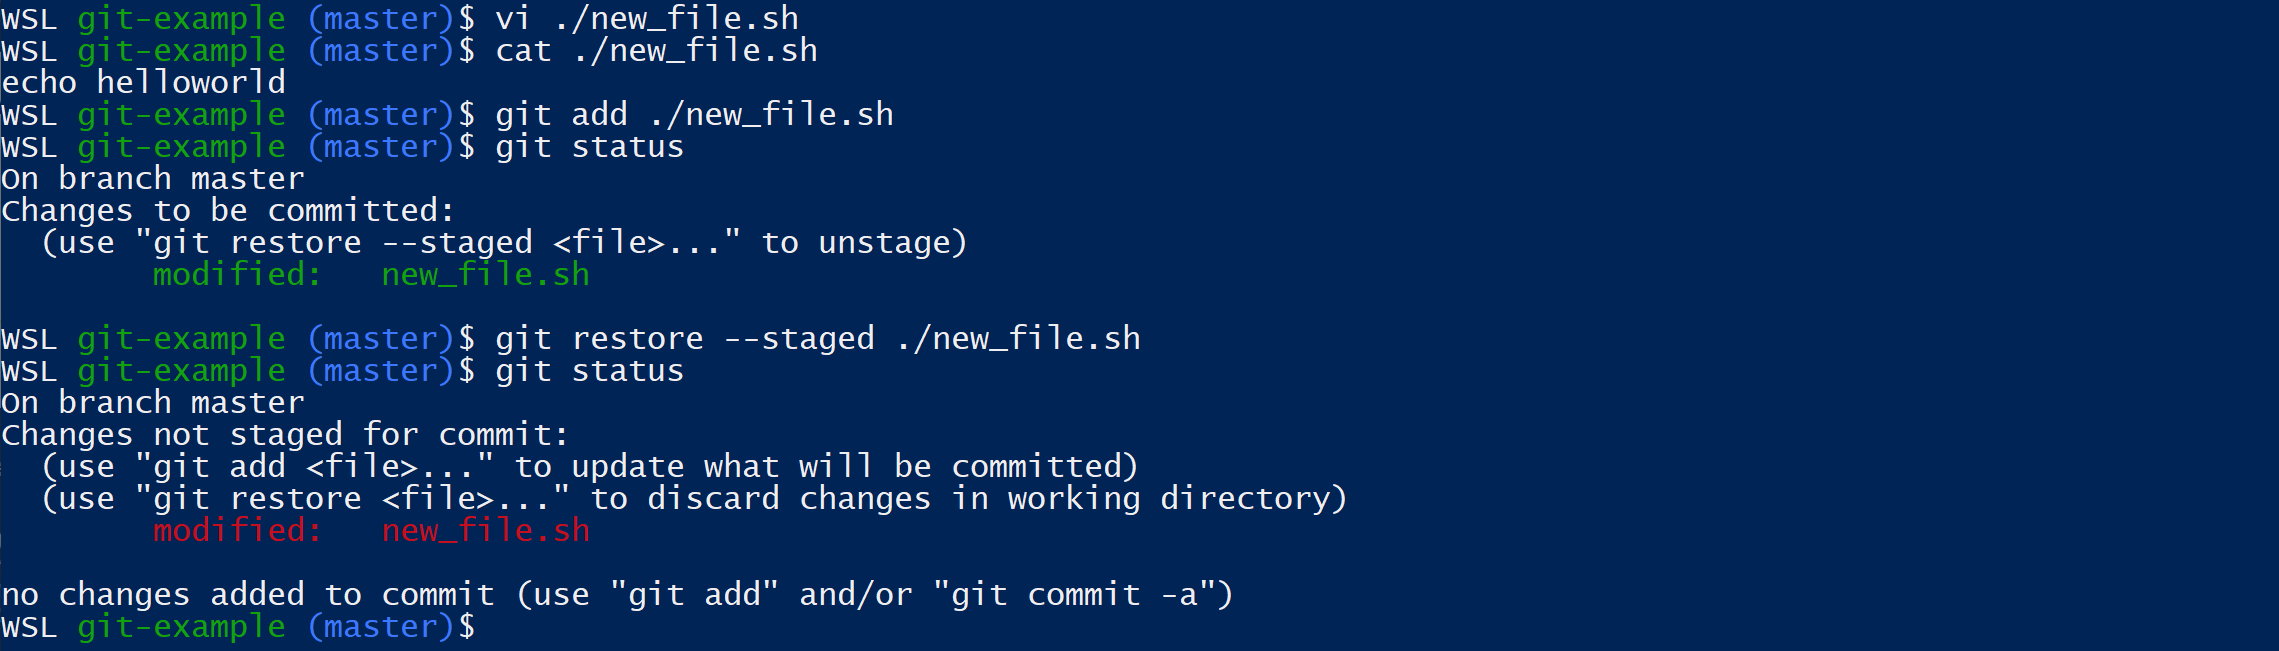
We can now change the file and use git add again to get the file ready to change. Using git status will show us that our file has been modified and is staged, ready to be committed.
$ echo "echo hello world" > ./new_file.sh
$ git add ./new_file.sh
$ git status
 We can now commit our change with
 git commit.
$ git commit
I’ll cover a few suggestions on best practice later, but as a general rule commit messages should start with a summary written in the imperative mood: which just means, written as if a spoken command. This summary should be no longer than 50 characters and can be followed by a longer message which should give the context of why the changes have been made - git diff can always show us what changed.
Undoing Changes
There are a few options here and things can get a bit complicated so I’m going to cover a few simpler situations: un-doing changes to a file, un-staging files and committing to the wrong branch.
- Saved a change and don’t like it?
git restore <file>will undo your changes back to the last commit.

- If you’ve staged a file with
git add <file>it’s only the addition of a--stagedflag to ourgit restorecommand to un-stage that file
- Committing to the wrong branch is a pain, but not un-common. Luckily, it’s also pretty simple to resolve.
Wrong Branch Commit 1: You forgot to create a new branch…
The easiest way to resolve this is to use git reset HEAD~n where n is the number of commits to reset. This will reset your commits but retain your changes as un-staged files.
Adding the --hard flag will remove the changes.
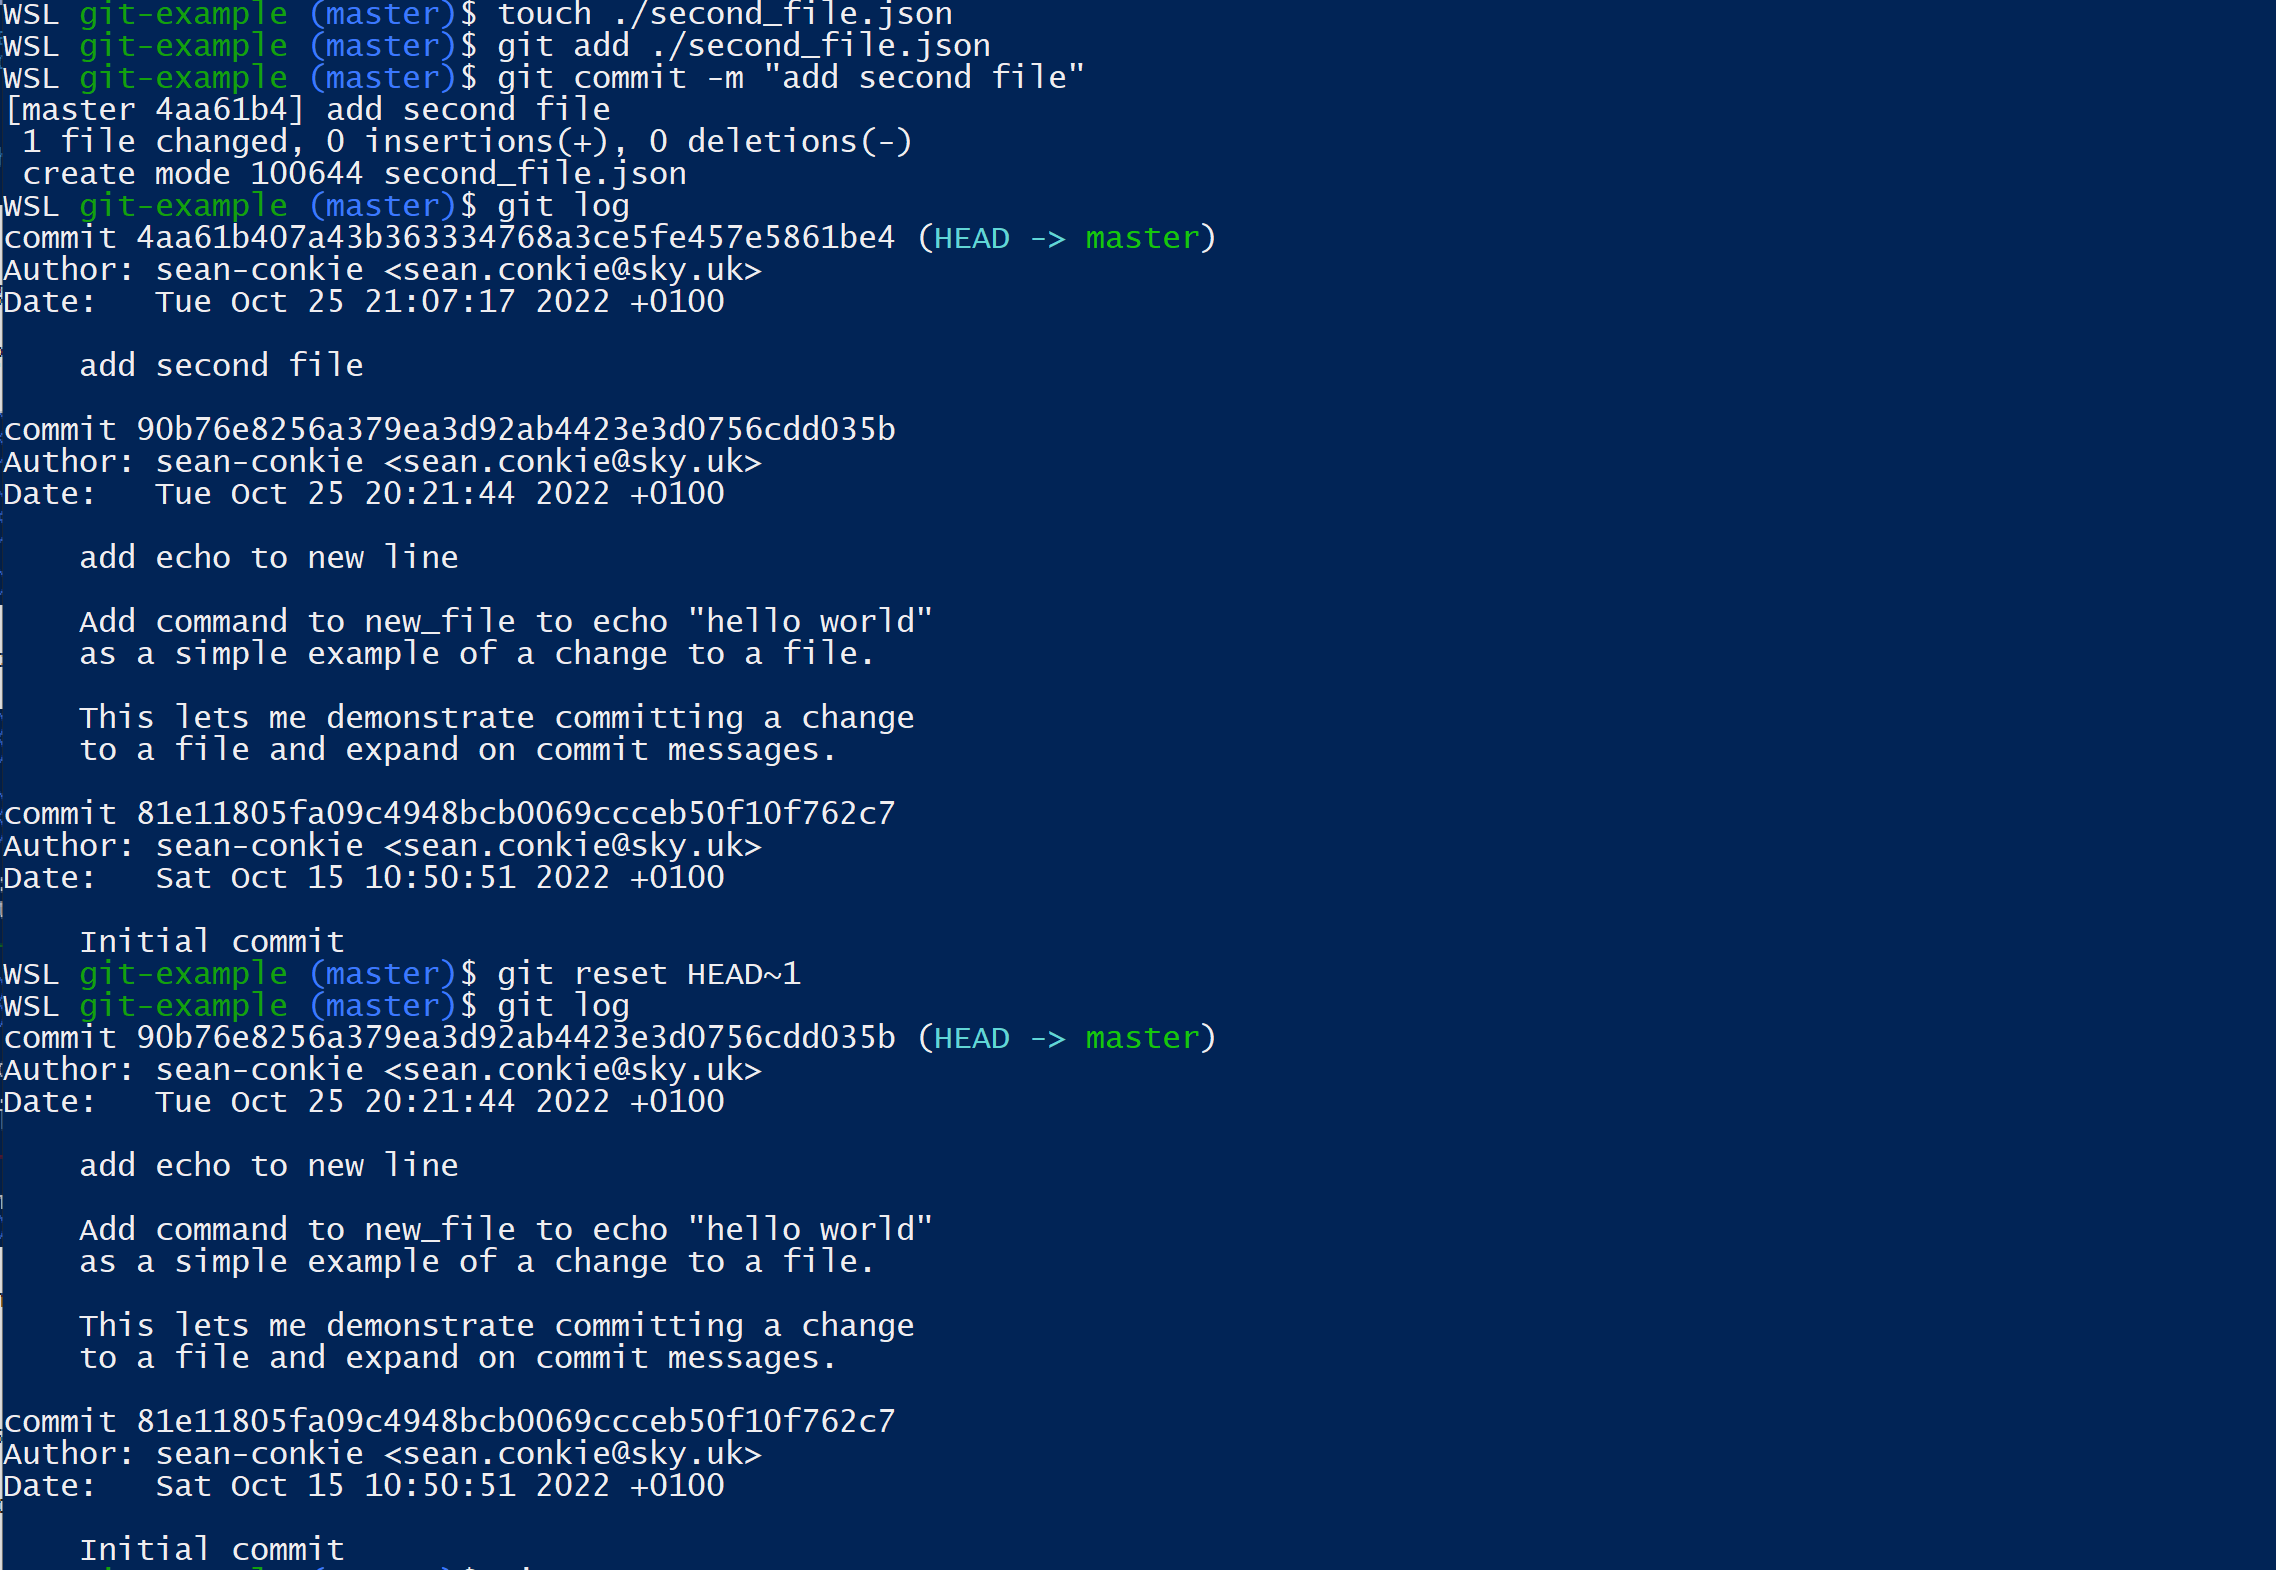
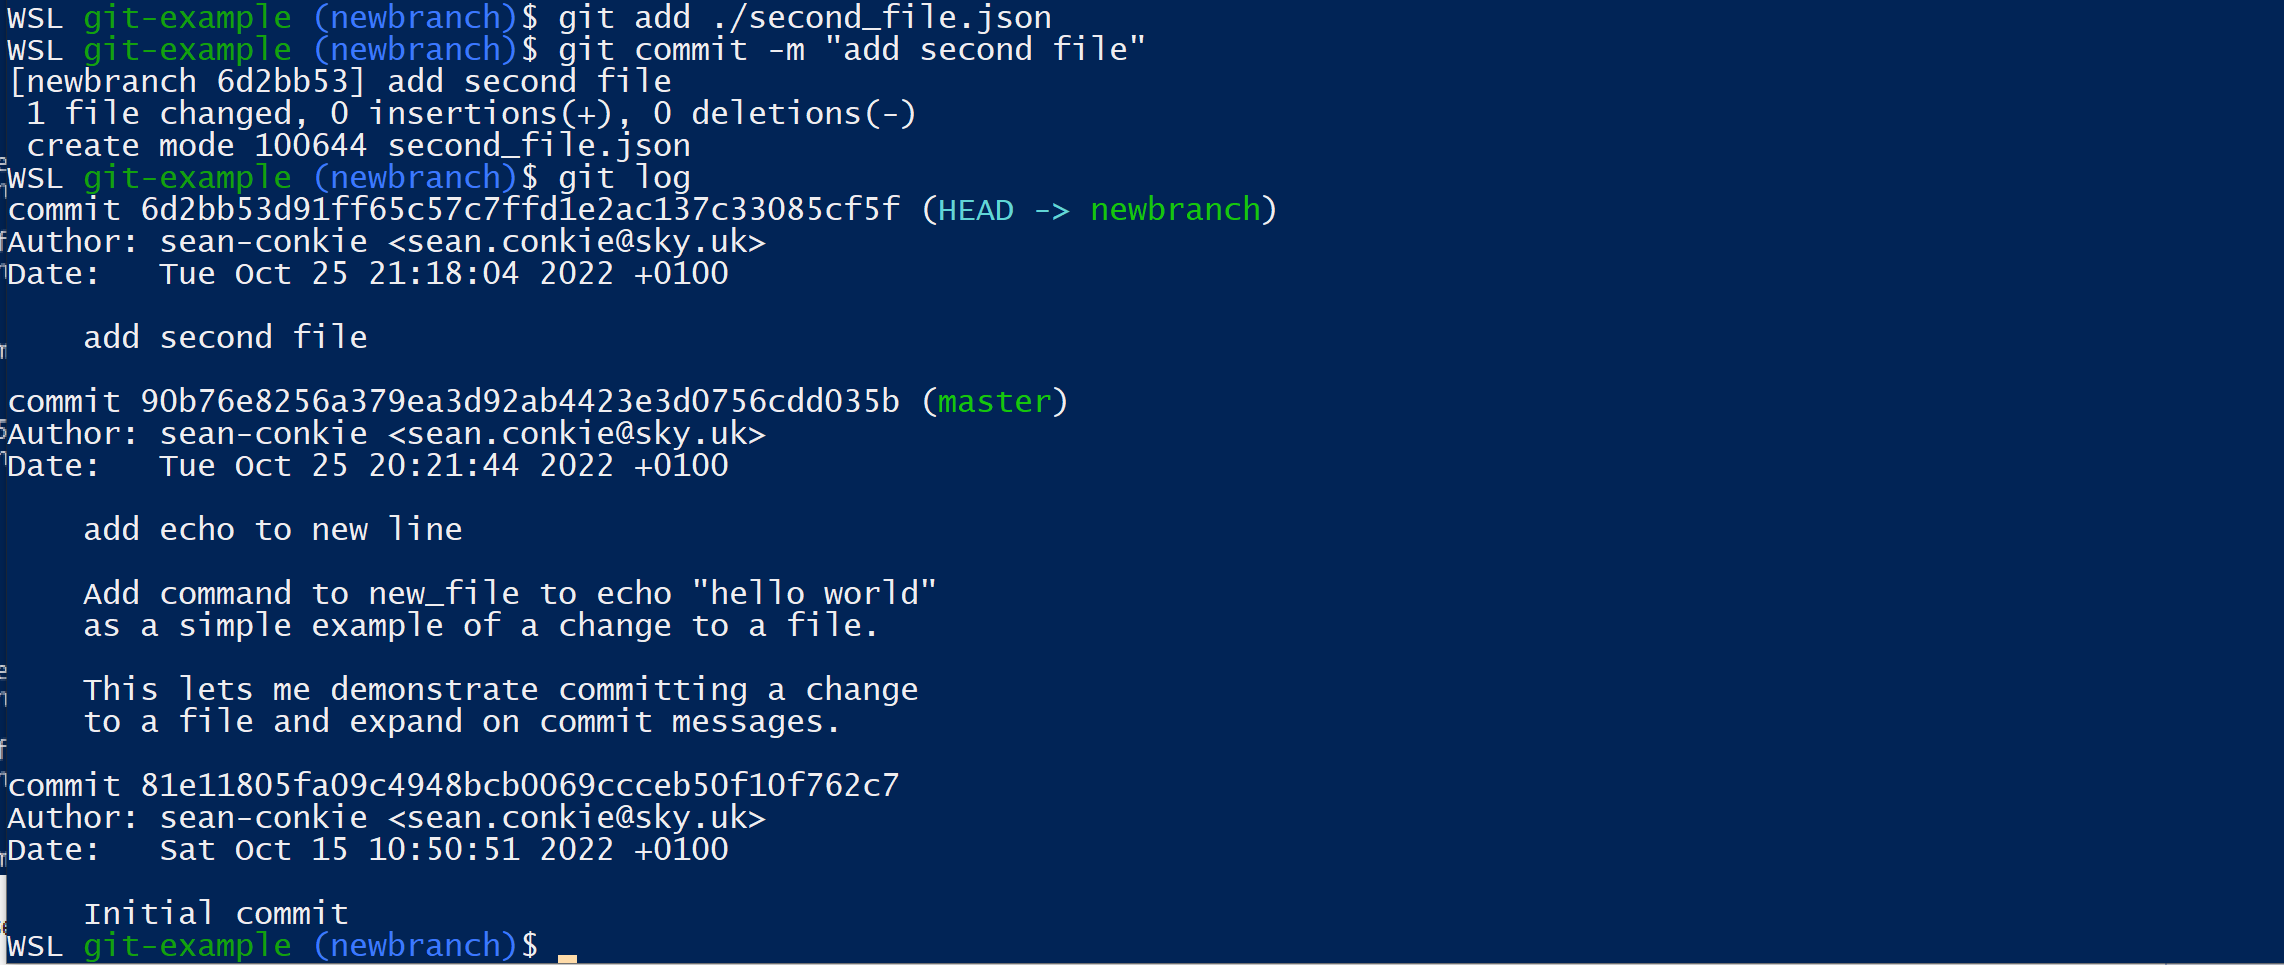
Now that we have reset the commits we can create a new branch using git switch with the -c flag and commit our changes in the correct branch.
$ git switch -c newbranch
$ git add ./second_file.json
$ git commit -m "add second file"
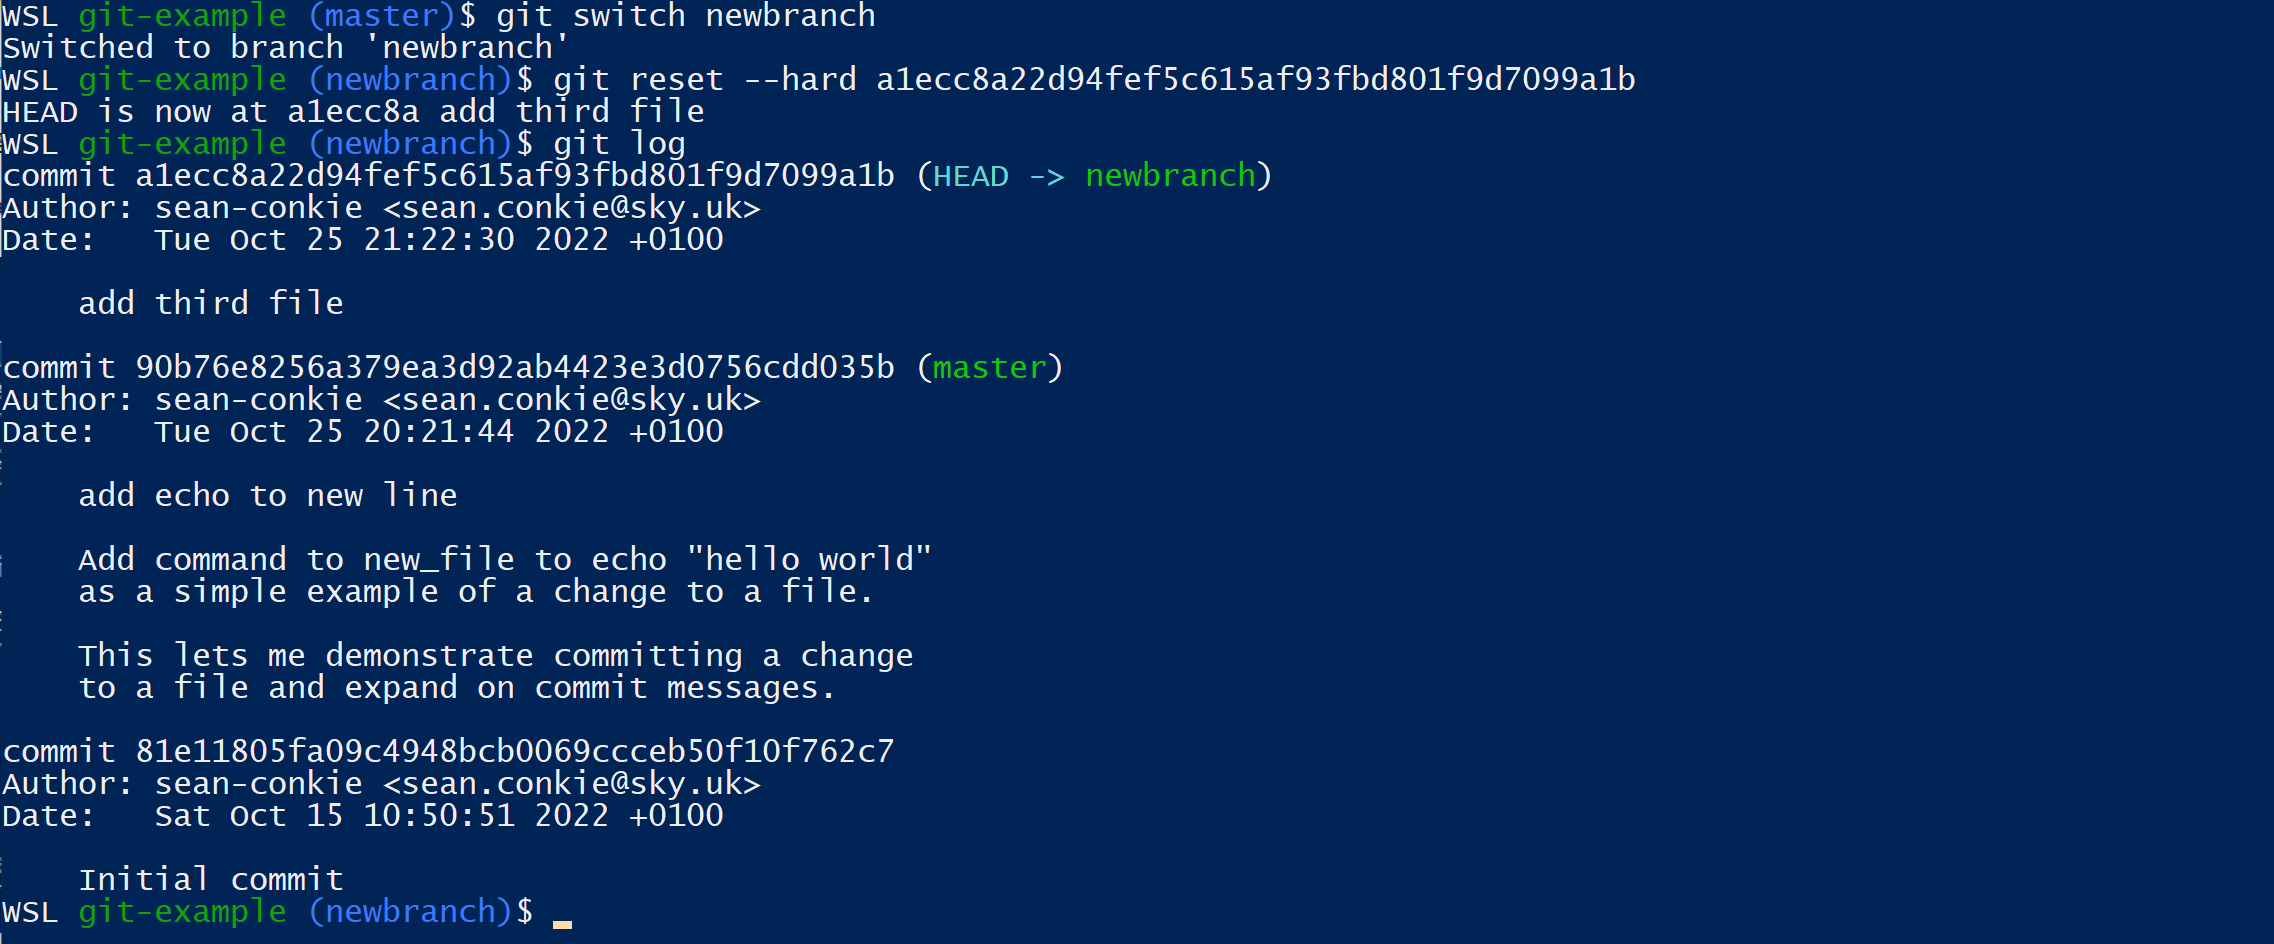
Wrong Branch Commit 2: You made your commit on the wrong branch…
This approach is similar, but instead we’re going to use the --hard flag and commit id to move the commits.
First we want to use git log to get the commit id of the current commit, we need to use this to move the commit so keep a note of it!
We can then use git reset --hard HEAD~n with the addition of the --hard flag.

To move the commits, we switch to the correct branch and use git reset but this time we use the commit id instead of HEAD~n.
$ git switch newbranch
$ git reset --hard <commit id>
Pushing Changes
Now that we’ve made our changes we need to push them to our remote repository.
If you’ve not cloned a remote repository to create your local repository, you can add an origin with the git remote command.
With this command there are 4 common uses:
- Add a remote
$ git remote add [remote name] https://<username>:token>@github.com/<username>/<repo name>.git - Remove a remote
$ git remote remove [remote name] - List all remote repositories
$ git remote -v - Replace remote origin
$ git remote set-url origin git://new.url.here
With a remote repository set up we use the git push command to push our changes. If the branch doesn’t exist on the remote then use the --set-upstream option.
$ git push --set-upstream origin newbranch
Checkout or Switch
On the face of it, these two commands are the same:
| Checkout | Switch | Description |
|---|---|---|
git checkout my-branch |
git switch my-branch |
Switch to branch my-branch |
git checkout -b my-branch |
git switch -c my-branch |
Create and switch to my-branch |
Both can be used to switch or create branches, but what is the difference?
git checkout is the older command used to switch/create branches (along with git branch <new branch name>) but it has additional uses, allowing you to copy files or commit directly to the working-tree without switching branches.
git switch was introduced in Git v2.2.3, specifically for switching/creating branches.
So, it’s a good practice to stick with the git switch command for branch creation and switching and leave git checkout for the more advanced working-tree options.
My “Best Practices”
Like I said before, I’m not an expert, but these are the best practices which I try and follow.
Use git
It sounds obvious, but if you are going to use git…use it.
Don’t make different version of files in various local directories then copy the “final” version into your local repository. It’s a waste and only means you’re going to commit the wrong file.
Instead, learn the basic git usage and use it to track your changes and share them with your team.
Don’t push to master, develop using branches
A feature of git, one of the central requirements of git, is easy branching. Pushing code straight to master doesn’t promote collaboration or allow for control over different lines of development.
By creating feature branches and using git’s compare features we can encourage discussion, knowledge sharing and improve the quality of our codebase.
The branch separates our in-progress changes from our stable codebase and stops clashes with other developer’s changes. It means that we can all push our work to the central repository where it can be compared, reviewed, merged or picked up by someone else.
Limit branch scope
Much like atomic commits, keeping branches to only a single feature or fix makes reviews faster and reversions easier. It helps to avoid mixing multiple lines of development, and creating dependencies or coupling between features.
This is not about having as many branches as possible, but grouping work by context. You might refactor a component while applying a fix as two commits on the same branch. But adding two independent features would mean two branches.
Use a branching strategy
Your branching strategy is left up to you and your team, and different strategies work best depending on the maturity of the team and the work being done. You could choose to have long-running branches, topic branches, personal branches, or use strategies such as GitFlow. The important thing is making sure everyone agrees on a common workflow which everyone follows.
My personal preference is GitFlow: development is completed on a develop branch and merged to a release branch once complete, this then merges to a main “stable” branch where releases are created. This probably works best for larger teams with regular releases.
Prior to making the first production release a topic or feature branch strategy can make more sense.
Keep up-to-date
Before you create a branch always make sure you have the current version, use git pull to pull the remote files to your local repository.
Commit small, commit often
Commits should be atomic, one task or one fix, and contain the smallest amount of code possible to complete that task. This makes review and reversion easier and splits changes into small batches of “value” which can be tested and validated.
Small changes reduce the likelihood of conflicts as the longer a branch lives, the more it separates from the main codebase and becomes stale.
Where your change must be integrated by other developers, these smaller commits are easier to merge and have reduced or easier to resolve conflicts.
But, don’t commit half-done work
Only commit code when a logical component is completed. Each feature should be split into logical chunks that can be delivered quickly and so you can commit often. If you need to “commit” in-progress work to merge in other branches or to checkout a different branch then is git stash instead.
Write meaningful commit messages
This final piece I have touched on before and it is probably the easiest thing to change, as you can do it yourself.
Insightful and descriptive commit messages make everyone’s life easier, whether you’re understanding changes you made yourself or ones made by someone else.
Commit messages should start with a summary written in the imperative mood and no longer than 50 characters.
A helpful approach when writing your summary message is to use “Semantic Commit Messages”: this is where commit messages are structured based on the type of action with each type using a specific imperative.
- feature:
addbeta sequence - bug fix:
removebroken confirmation message - docs:
explainhat wobble - style:
converttabs to spaces - refactor:
sharelogic between 4d3d3d3 and flarhgunnstow - test:
ensurebutton closes window - chore:
addOyster build script
The body of your message should be used to provide more detail, mainly context: What was the motivation for the change? How does your change differ from the previous implementation?
It should be formatted using markdown.
That’s it
And that’s it, my overview and thoughts on git. I hope you found this useful.
git